Guide: Your website, start to finish · Chapter 7 of 9, Your address · article 1 of 2
Your own address
Rename your free address, or put your website, booking page and customer links on a domain you own.
Every shop has a free address that always works. With the Your own address add-on, your website or booking page can live on a domain you own.
Your free address, and renaming it
- Go to Settings → Domains.
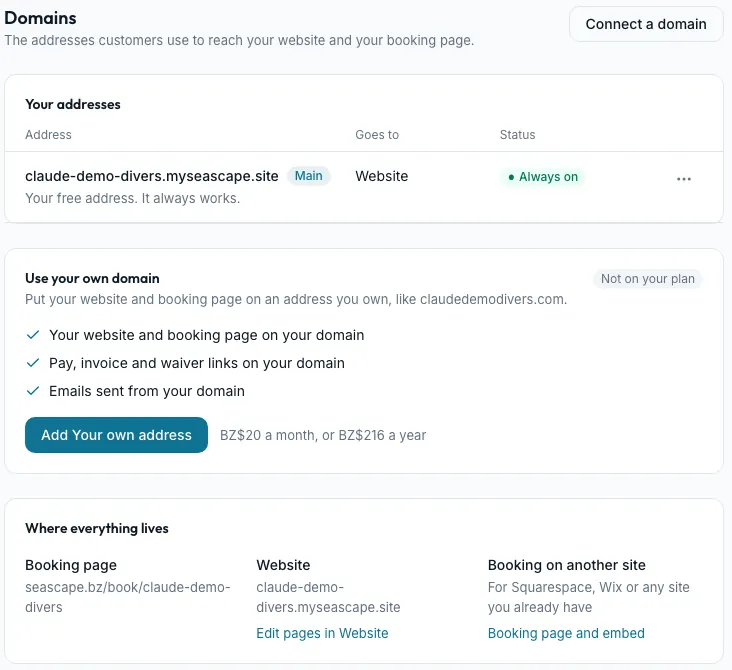
- Your addresses lists your free address, like yourname.myseascape.site, marked Main and Always on. Where everything lives shows your booking page and your website.
- To rename it, open the menu on your free address and press Rename.
- Type the New address and press Rename address.
Renaming needs no add-on. Old links, QR codes and calendars forward to the new address, your old name stays yours, and your Booking IDs don't change. You can rename once; after that the row says ask us, and Seascape support changes it for you.
Get the Your own address add-on
Plan requirement Your own address costs BZ$20 a month, or BZ$216 a year. It puts your website or booking page, and your pay, invoice and waiver links, on your domain, and sends your emails from it.
- On Settings → Domains, find Use your own domain, marked Not on your plan.
- Press Add Your own address. It opens Plan and billing when the add-on is on sale; until then it starts an email to Seascape support to ask for it.
Connect your own domain
Connecting www or the bare domain replaces whatever website shows there now, so publish your new website first. Never change your MX records or nameservers to connect a website: your email depends on them.
- On Settings → Domains, press Connect a domain and type your domain, like yourdiveshop.com.
- Seascape names where your domain's DNS is managed, such as GoDaddy, Cloudflare, Squarespace or Wix. If it's wrong, press Not right? and choose your provider.
- Choose Where it goes: Website or Booking page. For a website the address is www.yourdiveshop.com, and yourdiveshop.com forwards to it. For a booking page it's book.yourdiveshop.com. Press Continue.
- Follow the steps for your provider. They show the one record to add: a CNAME pointing to cname.myseascape.site.
- If someone else looks after your domain, press Email these steps to someone.
- Press I've added it.
Seascape checks every 30 seconds and names anything that's wrong, such as a record pointing somewhere else or Cloudflare set to Proxied. It usually takes a few minutes, sometimes an hour, and Seascape emails you when it is live. The first domain to go live becomes your main address, so new links and QR codes use it. Links you already sent keep working.
Note At Wix, Network Solutions and Namecheap, the bare domain (yourdiveshop.com) can't forward yet. Use www only, or move your DNS to Cloudflare, which is free, after copying every email record across.
Manage a connected domain
Each address on Domains has a menu with Check now and Disconnect, plus Make main, Change where it goes or Show the records when they apply.
If your record changes, the address says what Seascape found, with Show the record to fix, and new links use your Seascape address until it's fixed. If you stop the add-on, your domain keeps working for 30 days, then forwards every link to your Seascape address.
Still stuck?
Signed in, it can also look at your own shop.
A person reads every one: support@seascape.bz